

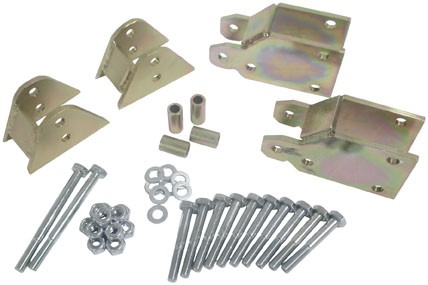
You will need:
- A Shock Spring Compressor
- Front Spring Stiffener (2ea.)
- Rear Spring Stiffener (2ea.)
- Front “L” Brackets4ea.)
- 10mm Flat Washer (4ea.)
- 10×50 Hex Bolt (4ea)
- 10mm Lock Nut (4ea)
- 6×45 Hex Bolt (2ea)
- 6mm Lock Nut (2ea)
- Spacer (2ea)

Front Lift Installation
- Place jack under center on the ATV front end and lift until front wheels clear the ground. Be careful to support ATV properly so that it is secure, but so that the A-arms and shocks can droop to full extension.
- Remove front wheels and shocks.
- Using a shock spring compressor, compress the spring on the shock and remove the spring retaining ring. CAUTION: The spring is installed under tension. Failure to use a shock spring compressor could cause loss of control of the spring, which could unload rapidly causing bodily injury. If you do not have a shock spring compressor you should acquire one or take it to a dealer or professional mechanic for installation of the stiffeners.
- Remove the spring.
- Insert the smaller front spring stiffener onto the shock with the lip of the spring stop, on the shock, mating into the recessed portion of the spring stiffener.
- Slide the spring back onto the shock and it should rest on the lip of the spring stiffener.
- Reattach the spring retaining ring.
- Repeat steps for the opposite side. Once springs are complete reattach the top of the shock to the top shock mount on the ATV and the spring stiffener will be closest to the A-arm.
- Take two of the “L” brackets and connect them to the bottom of the shock, the part that connects to the A-arms.
- There is a top and bottom to the “L” bracket.
Steps for installing the Front Lift “L” Brackets:
- Insert one 10X50 hex bold into the “L” bracket and slide it into the shock through the spacer.
- Connect the second “L” bracket to the other side and secure it with the 10mm Lock Nut. Keep bolts loosely fasten, until the 6×45 hex bold is inserted.
- Insert the 6X45 hex bolt with the 6mm washer into the front of the brackets sliding in through above the spacer and securing it with the 6mm washer and lock nut on the backside. Once the 6×45 hex bolt is installed fasten it tight, then fasten the 10×50 bolt tight.
- Secure the shock with the bracket attached to the shock mount on the A-arms with a 10-50 hex bolt. Place a 10mm flat washer between the bracket and shock mount. Fasten with the 10mm lock nut.
- Completed view of the shock mount bracket and the spring stiffener.
- Repeat steps for the opposite side.
Rear Lift Installation:
- Place jack under the center ATV rear differential and lift until the weight is off the suspension. Be careful to secure ATV properly so as not to fall off the jack.
- Remove the Wheels and shocks.
- Using a shock spring compressor, compress the spring on the shock and remove the spring retaining ring.
- Remove the spring.
- Insert the larger rear spring stiffener onto the shock with the lip of the spring stopper, on the shock, mating into the recessed portion of the spring stiffener.
- Slide the spring back onto the shock and it should rest on the lip of the spring stiffener.
- Reattach the spring retaining ring.
- Reattach shock back to the ATV with the spring stiffener to the top nearest to the top shock mount.
- Repeat steps for opposite side.
- Place wheels back on the ATV and lower jack.
For more parts and maintenance tips please see our sponsor at PartsPitstop.com
Credit: Quadboss
