

Today’s new “rack” twin cylinder flat slide carburetors are still using the same technology as the older unracked or round slide carbs of years past. However, today’s newer versions have some serious performance and tuneability improvements. The use of only one idle adjustment, one throttle pull, and one choke lever are a few of the advancements that help with consumer consistency and reliability.
When comparing an older round slide carb to the newer flat slide you’ll notice an increase in throttle response and improved gasoline atomization, which in-turn will increase horsepower potential, and gas mileage. Even though the newer carburetors are more advanced and easier to use, many of the same theories still apply, and you should still regularly inspect, clean and maintain carbs regardless of how advanced they are.

^^^ Find All Your Carb Replacement Parts Above ^^^
Carburetor Removal
Step 1:
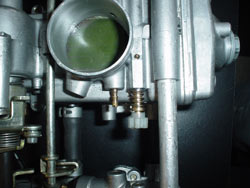
Removing the carburetors completely from the machine is the easiest way to properly clean them. Start by simply removing the air box. Then, removing the carbs in most machines is done by easily unclamping them and pulling the carbs out of their intake boots.
Step 2:
With the carbs removed from the boots, make sure you pull the fuel line off the tee intake between both carburetors.
Step 3:
Then, there are two cables that need to be undone or separated from the carb; these are the throttle and choke. These cables can be removed by using a needle-nose pliers to pull the e-clip and unwind the cable out of its locked-in area. When removing the cable from its mount it’s best not to un-tighten the top lock nut. The lock nut setting is your current setting, so if you cannot re-adjust the cables it’s best not to change the current location.
Step 4:
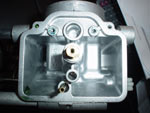
With the carbs completely unhooked from the cables you are able to start unbolting the carb float bowls. The typical Mikuni carb bowl has two mounting procedures. There may be a small screw on one of the corners. This allows removal of the center bowl nut without having the float bowl disconnect from the body during a main jet change. When full removal of the bowl is required, as in our cleaning, these need to be removed as well as the large center nut, allowing the entire bowl to be taken off.

Step 4
Step 5:
After removing the bowl you can access the internal parts for cleaning. Simply spraying the bottom with carb cleaner will not fix any cleaning issues. Full removal of all the jets is required. The most common plugged jet with carburetors is the pilot. This jet controls the idle circuit of the machine. The pilot jet can only be accessed by removing the bowl. Location of the pilot jet is typically found down the small tube that is part of the main body. It can be removed with a small standard screwdriver.
When removing the pilot be sure to not strip the head because trying to remove it after stripping the head is almost impossible.
Step 6:
Next remove the main jet, this can be found directly in the center of the carburetor. Removal requires a 6mm socket or nut driver, when removing the main jet some carburetors have a washer underneath them, be sure not to lose or forget to re-install it. Take note that some Polaris snowmobiles are equipped with a starter jet that is located right next to the main jet and requires a large standard screwdriver for removal.
Step 5, 6
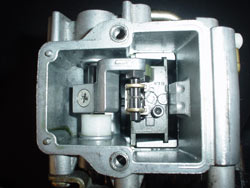
Step 7:
Last you’ll remove the needle and seat assembly inside the bowl. Most rack carburetors have a complete plastic assembly that has two Phillips screws holding it in place. Remove the two screws and pull out the assembly. The float bowl and needle and seat assembly then needs to be disassembled to remove the needle and inspect the seat and main fuel intake port. Most assemblies snap apart and back together again to allow easy access to the needle, and seat.

Step 7
Externally Speaking
AFTER REMOVING the internal bowl components it’s time to dissemble the external parts.
Step 8:
Unscrew the fuel screw, which usually is the one with the large white handle. Also, always remember to check fuel screw settings before removal. To do this, count the turns in (tighter) until it lightly seats, this is your re-installation setting, then completely unscrew and remove the screws. To properly set the fuel screws the service manual should be used as a reference for proper settings.
Step 8
Step 9:
Next, unbolt the top cover plate and remove the jet needle. This is done by using an Allen wrench and loosening the hook that holds the needle in place. After loosening the clamp you can turn the hook to the side and pull the needle straight out through the top. There is a dampening shim right under the e-clip that slides on from the bottom of the needle. Be sure not to lose it during removal. The main reason for removal is to make sure the needle is not bent and to open the needle jet hole for easier cleaning. Complete removal of the flat slide is not necessary for cleaning.
Step 9
Step 10:
Finally, with all the jets removed, and carburetor ports open, the main body can be cleaned. This is best accomplished quickly by using high-pressure air. The jets can be held up against an air blower and cleaned. The ports in the carbs can be soaked in carburetor cleaner and then hit with air pressure to be cleaned out. Be sure to use the carburetor cleaner in the ports and view the spray coming out the other side, it should be a clean mist. This ensures the port is free from debris.
Often jets have been corroded for a long time, and need to be soaked for longer periods. In extreme cases the jets may be too damaged due to corrosion and may have to be replaced.
Replacing jets is inexpensive, typically $6-7 per carburetor for the jets. In the case of a needle and seat needing to be replaced, the typical cost is $15 to $25 per carb. With all the small internal parts including jets, the needle and seat assemblies, replacement is always the safest way to ensure that there are no clogged areas.
Reassembly
After cleaning or replacing the jets, and soaking the carburetor’s main body assembly, the reassembly of the carbs can begin.
Step 11:
Install the pilot, main, and starter jets in the main body. Be sure not to over-tighten the jets during installation as they require only a slight snug to stay in place.
Step 12: Install the main body seal and bolt down the face plate. The four screws should have a slight touch of green lock tight added to them to keep them in place.
Step 13: Drop the needle through the top with the e-clip and dampening washer, slide over the clip and bolt down to hold in place.
Step 14: Re-install the top cover plate and carburetor bowls and nuts.
Step 15: You can simply retrace your disassembly steps by reconnecting the choke and throttle cables, attaching the fuel line, and reinstalling the air box.
Now you’ve done a complete disassembly, reassembly and cleaning of your carbs!
Credit: by Jason Houle via American Snowmobiler
For more information about customizing your bikes, motorcycles, tons of the best OEM brands, personal watercrafts, atvs, parts, accessories, or maintenance tips please see our sponsor at: PartsPitStop.com .
#partspitstop # #snowmobile #carbclean #seasonalprep #DIY #outdoorlife #rideeverywhere #oemparts #aftermarketparts #oemaccessories #aftermarketaccessories
